| HOME | PHOTOSHOP | DOWNLOAD |

WELCOME to my site Hope my post can add your knowledge and make you keep learn to reach a DREAM
Click on Image to see Tutorial

Frozen Text Parental WArning SmokedBurnedTExt Text in The Net Wooden Text 3D Colorful Text GreenField GreenRays Text OLD SpeLL Book Water Looks ELectric TexT GeL Text Grass Letter Shocking Text Mercury Text ReaListic Planet Stroke Text
To Download go to Download Page

Friday, September 5, 2008

3D TexT with Shadow use Photoshop


This time I try to make 3D text with shadow. Complicated but still easy to make it if follow the instruction on this tutorial. Just follow it step by step. Let see the tutorial, you can download pdf version here... or keep on this site and readMore...

1. Create new file with dimension 700x200 pixels and Resolution 72 pixel/inch. Dimension of the file depend on your text length.
2. Choose orange (#F7941C) for foreground color, then activate Horizontal Type tool. Define font: Arial Black and size: 100pt. Type your text, in this chase I'm using my blog name . ^_^.


3. Press CTRL + J to make duplicate of text layer. Arrange the text layer copy and place it below the original text layer. Then click eye icon of text layer to hide it.

4. On layer palette double click on text layer copy to show Blending option dialog box. Choose on Bevel and Emboss and define Style: Inner Bevel, Technique: Chisel Hard, Depth: 90 and Soften: 0.

5. Still on text layer copy, activate Move tool then with ALT key on hold press Arrow UP button on your keyboard just one time. You will get duplicate of text layer copy and named "text layer copy 2".

6. Now repeat step number 5, but this time press Right arrow.
7. Repeat step number 5 and 6, about 5-10 times. And your layer palette should look like image below.

8. Click eye icon of background layer to hide it. Then on menu choose Layer>Merge Visible or use CTRL + Shift + E. All layers visible will merge and you got layer palette like image below.

9. Click on original text layer to show it back. Activate Move tool and arrange the original text, move it to right until you get image like below.


10. Next double click layer text on layer palette to show Blending option dialog box. Choose on Stroke and define Size: 1, Position: outside, Opacity: 100, Fill type: Color and choose #603811 for color.

11. On layer palette, right click on text layer and choose Copy Layer Style then right click on text layer copy and choose Paste Layer Style.

12. Next step, activate background layer then create new layer. Your layer palette should look like image below.

13. Activate Gradient tool and choose Reflected Gradient from Option bar.

14. Define foreground color: #F7941C and background color is white #FFFFFF. Using Gradient Tool, make gradation like image below.


15. Activate Rectangular Marquee tool and make selection like image below. Then press Delete on your keyboard . Press CTRL + D to loose the selection.

16. Next create new layer and place it below the layer 1.

17. With the new layer 2 selected, activate Gradient tool but this time choose Linear gradient on option bar. And make gradation like image below.

18. Activate original text layer, define Foreground Color: #F7941C and Background color: #FFF799. Double click on original text layer and add new layer style, choose Gradient Overlay. From dialog box choose Gradient Type : foreground to background.

19. On layer palette, with CTRL button on hold click original text layer and text layer copy to select it. Then right click and choose Link layers.

20. Press CTRL + E to merge both layer. Then create duplicate of it use CTRL + J. On menu choose Edit>Transform>Flip Vertical. Then activate Move Tool and move text down like image below.


21. Next click icon Add Layer Mask on layer palette. Activate Gradient tool, make sure that Linear Gradient selected on Option Bar. Press D button then make gradation on layer mask like image below.


And my final result like image below.


Monday, September 1, 2008

SiLver TexT on Photoshop


This section almost same with technique I posted before, but this time I try to use Gradient Tool , Linear Gradient tool, Radial Gradient Tool, and few of layer style. Photoshop have many of technique so we can learn it one by one and try to combine one and another until we get new technique. Ups..am I speak too much?
OK, then lets see the tutorial …you can download it here... or keep read... more...
1. Create new file with dimension 600x300 pixel and resolution 72 pixel/inch.

2. Define foreground color is Black: #000000 and background color Dark Blue: #003371. Activate Gradient Tool and choose Foreground to background on gradient picker box and Linear Gradient on option bar. Create gradient like image below.

3. Next change background color to Light Blue: #00AEEF. Still using Gradient Tool, but this time choose Radial Gradient and checklist on Reverse on Option Bar.

4. Create new layer, then create gradient. Drag your mouse from the bottom right corner to the upper left corner of the canvas. Then change layer 1 Blending option to Screen.

5. Activate Horizontal Type tool, define font: Verdana, size: 80pt, Style: Bold Italic, Color: white #FFFFFF. Type your text and press CTRL + Enter if you done.

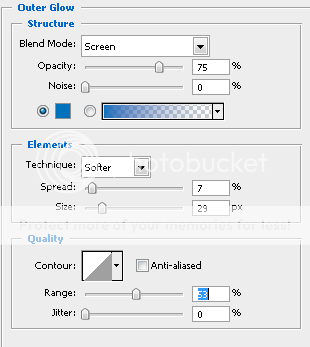
6. Still working on text layer, double click text layer on layer palette to show Blending Option dialog box. Choose Outer Glow , define Blend Mode: Screen, Opacity: 75%, color: #0071BC, Technique: Softer, Spread: 7, Size: 29 and Range: 53. Don’t press OK yet, still more to do.

7. Now choose Inner Glow, define Blend Mode: Screen, Opacity: 100%, color: #0071BC, Technique: Softer, Source: Edge, Choke: 0 and Size: 24. Don’t click OK yet, still more to do.

8. Next choose Bevel and Emboss, define Style: Inner Bevel, Technique: Smooth, Depth: 51, Direction: up, Size: 5 and Soften: 0. On Gloss contour, click on the box to show Contour Editor window, then create contour curve like image below.

9. Next choose Stroke and define size: 2 and color: Black #000000. Now you may click OK.

10. Next press D button on your keyboard to reset Photoshop color to default. Create new layer and bring it to the top of all layers. Change Blending Mode of new layer to Soft Light.

11. Last step apply Filter>Render>Clouds, repeat this step use CTRL + F until you get image you want. The values on this effect is not fix, you can try different value to get better result. And also you can save the layer style, so if you want to use it again you don’t have to make it over from the start.


Wednesday, August 27, 2008

Photoshop Tutorial: NeoN TexT


This section is like my other post before about make banner for your blog. But it have a different result. May be this can be alternate if you want to make your banner easier. Let see the tutorial…
You can download it here... or keep reading More...


1. Create new file with dimension 400x120 pixels and resolution: 100 pixel/inch. Press D button on your keyboard to reset Photoshop color to default. Fill background layer with black color use ALT+DEL.


2. Activate Horizontal Type Tool and type your text. Use Verdana as font with size 42 pt and Style: Bold Italic. After you set font, style and size then now hide background layer. Click on the eye icon of background layer to hide it. Now you may type your text and press CTRL + Enter if you done.

3. Still working on text layer, double click text layer on layer palette to show Blending option dialog box. Choose on Outer Glow and define Blend Mode: Screen, Opacity: 75%, color: #0071BC, Technique: Softer, Spread: 0, Size: 43.

4. Press CTRL + J to create duplicate of text layer. Double click on text layer copy to show Blending Option dialog box. Choose on Inner Glow, then define Blend Mode: Screen, Opacity: 75%, color:#0071BC, Technique: Softer, Source: Edge, Choke: 0 and Size: 10.

5. Click eye icon of background layer to unhide it. Now create new layer and the new layer must automatically name Layer 1. Bring the layer 1 to the top on layer palette. Change layer 1 blending mode to Color Dodge.

6. Last step, on menu choose Filter>Render>Clouds. Repeat this step until you got image that you want. My result like image below.