| HOME | PHOTOSHOP | DOWNLOAD |

WELCOME to my site Hope my post can add your knowledge and make you keep learn to reach a DREAM
Click on Image to see Tutorial

Frozen Text Parental WArning SmokedBurnedTExt Text in The Net Wooden Text 3D Colorful Text GreenField GreenRays Text OLD SpeLL Book Water Looks ELectric TexT GeL Text Grass Letter Shocking Text Mercury Text ReaListic Planet Stroke Text
To Download go to Download Page

Wednesday, July 23, 2008

Make A Magnifier Image with Photoshop

Photobucket

Today I learn using Custom Shape tool on Photoshop and also use already Layer Styles. Make an image like magnifier and its not hard at all, just follow the tutorial step by step and I did it. Let me show you the tutorial download pdf here... or keep reading More...
Prepare an image that you like and use Elliptical Marque Tool to make selection . To make it perfect circle hold Shift button when you make the selection.
Photobucket

Create a new layer and fill the selection layer use gradient tool and choose black and white gradient.
Photobucket

Release the selection area use CTRL + D. Double click on layer glass to show the Style Blending option. On general blending option define blend mode: overlay.
Photobucket

Click on Drop Shadow and define Blend Mode: multiply, color: black #000000, Opacity: 50%, Angle: 120⁰, Distance: 1px, Size: 2px.
Photobucket

Now click on Gradient Overlay define Blend Mode: screen, Opacity: 55%, Gradient: black and white, check box reverse option, Style: radial, Angle 180⁰, Scale: 135%.
Photobucket

In Stroke option define Size: 1px, position: inside, Blend mode: normal, Opacity 100%, Fill type: gradient, Gradient: black and white, Style: shape burst, angle: 90⁰, scale: 135⁰.
Photobucket

After that click OK and you should got like the following image.
Photobucket

Now create a new layer and click on Custom Shape Tool then define the shape: search.
Photobucket

Hold left mouse button and drag to create an image of magnifier and move it over layer 1. the layer automatically name shape1.

Photobucket

Apply layer style to layer shape 1, choose Mercury on Style palette. If not there you should read my post Mercury Text here.
Photobucket

Right click on layer shape 1 and choose rasterize layer. After that choose both layer ( layer 1 and shape 1) use CTRL + click and right click on its choose link layers.
Photobucket

That’s it, an image of magnifier is done.
Photobucket

Tuesday, July 22, 2008

Mercury Text

Photobucket
Text like an iron or steel maybe, cause its so shine. And this time the difficulty not like other text effect before, its harder. But still I can make it because this tutorial so detail with the picture on it. Curious? Let me show you the tutorial download the pdf here... or keep reading
More...
Create a new file with any dimension you like with black color as a background. Type your text on it use white as a color and font anything have big dimension.
Photobucket

On layer palette, right click on layer text and choose Rasterize Type. Now double click on it to show Style Blending option. Click on Drop Shadow and set Blend mode: Multiply, color: Black #000000, opacity: 50%, Angle: 120⁰, Distance: 5px, size: 10px. Don’t click OK yet, more to do.
Photobucket

Now click on Inner Shadow option. Set Blend mode: multiply, color: white #ffffff, opacity: 75%, Distance: 5px, Size: 10px, define Contour: Ring doubled, check box Anti-aliased.
Photobucket

Now on Inner Glow option Blend mode: multiply, Opacity:100%, Color: white #FFFFFF, Technique: softer, Source: Edge, Choke: 10%, Size: 75px.
Photobucket

In Bevel and Emboss option set Style: inner bevel, Technique: smooth, Depth: 75%, direction: up, Size: 15px.
Photobucket

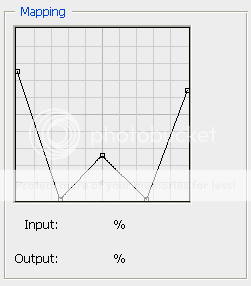
Click Contour option and click the thumbnail to set contour mapping . Set like image below the define Range: 22%.
PhotobucketPhotobucket

On Satin option set Blend mode: screen, color: white #FFFFFF, Opacity: 100%, Angle: 135⁰, Distance: 7px, Size: 11px, check box on Anti-aliased and Invert option, and custom the Contour mapping like image below.
PhotobucketPhotobucket

On Color Overlay option define Blend mode: Normal, color: Black #000000, Opacity: 100%.
Photobucket

On Stroke option define Size: 1px, Position: outside, Blend mode: normal, Opacity: 80%, Fill type: color and choose the color hex #333333
Photobucket

After all that your should have layer style blending option like image below. Make sure that all set right than you may click OK.
Photobucket

Than your Mercury text is done. You can save the style option if you want, so if you want to use it again you just do a simple click on it and done.
Photobucket


Sunday, July 20, 2008

Glowing Text Animated

gif animation
Today I learn how to make .gif image use Photoshop. I was try to make it use another program but I think that program too difficult for me. But after I try make this gif image with Photoshop its not hard at all. Just with few easy step and I can make it. Interested? Ok, let me show you the tutorial download here or keep reading More...
Make a new file with any dimension use black as background. Than type your text on it use white or another color you want.
Photobucket
Than double click layer text on layer palette to show layer style option. Choose outer glow and set opacity 100% color: what ever you want I use blue in here, technique: precise, size:18.
Photobucket
Duplicate layer text use CTRL + J, after that double click layer text copy on layer palette to show blending option. Choose outer glow again and set opacity to 50%.
Photobucket
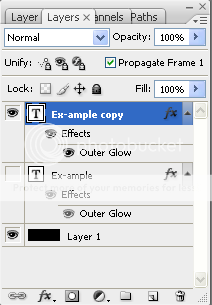
And you should have image and layer palette like below.
PhotobucketPhotobucket
Now in menu Window choose Animation to show animation window.
Photobucket
Set the delay to 0.2 sec. after that copy paste the frame after the selection frame.
Photobucket
Click the eye icon of layer text copy on layer palette to hide it. Then copy paste the frame again.
PhotobucketPhotobucket
Now we work on frame 3. click again on layer text copy to show it back and hide the text layer . Then copy paste again frame 3.
PhotobucketPhotobucket
Now working on frame 4, hide the effect of layer text copy. After that copy the frame 3 and paste after frame 4. Then copy the frame 2 and paste after the frame 5. Also copy the first frame and paste after frame 5. Now your frame window should be like image below.
PhotobucketPhotobucket
Click the play button to test how its run. If you think its run OK save it, in menu File choose Save for Web and Devices or use ALT + Shift + CTRL + S.
Photobucket
And glowing text animation is done. Easy isn't it?
gif animation

Friday, July 18, 2008

Electric Text Effect


Today I learn to make text with electric effect around the text. Using photoshop to make it. It's not hard because I have the tutorial or you can say a printed teacher. All this time I learn photoshop with this tutorial and don't have trouble to finish it, because it's so detailed. The image above is my work and I rewrite my action in this blog. So if you new with photoshop I thing this tutorial usefull. Ok, let me show you the tutorial downloand pdf here... or keep reading More...
1. Create a new file with custom size width 800 x heights 300.

2. Press D button on your keyboard to restore pallet color to default.Fill your work canvas with paint bucket tool, use black color.Type on canvas use Type Tool, the word should be long enough and use white color.

3. From menu, choose Layer - New - Layer to add a new layer on the text. Or use the short cut Ctrl + Shift + N. Use paint bucket tool and fill the layer with white color. Or use the shortcut Shift + F5.

4. In menu choose Filter - Texture - Stained Glass, set Cell Size = 22, Border Thickness = 6 and Light Intensity = 5.

5. Select the black line, zoom in your canvas and use Magic Wand Tool.

6. Don’t deselect it and add new layer on it. In menu choose Layer - New Layer . Name it electric. Fill that layer with white color, use the shortcut Shift + F5. And click the eye icon of layer 1 to hide it.

7. Click the cursor on text layer to activate it. Use Ctrl-click on text layer icon to select the text. In menu choose Select - Modify - Expand, and set 5 pixels.

8. Select electric layer and choose menu Select - Inverse or Ctrl + Shift + I , and push Delete key on your keyboard. Than deselect it, use Ctrl + D. Click the electric layer on layer panel. In menu choose Filter - Distort -Ripple, and set 156%.

9. Double click on electric layer to show Blending Options.

10. On Outer Glow option set Opacity: 50; Noise: 0; Spread: 9; Size: 8 and color code #2F68DC. Leave the rest on default.

11. Than in Inner Glow option set Opacity : 100%; Noise : 0; Choke : 100; Size : 0, and color code #A5DFFD

12. On Color Overlay option set color code #65A1E4, than press OK.

13. Now double click on text layer, and choose Gradient Overlay and click gradient overlay editor.

14. Set the color stop in Gradient Editor with the setting: #8AA2B8 on location 0%, #445B6F on location 49%, #597084 on location 50%, #B2C9DD on location 100%.

15. Last effect is set value on Stroke option. Set to minimum size, that is 1, position: inside, and color code #B3B3B3. Press OK.

Your electricity effect is done, look great isn't it? You can combine it with shadow or background as you wish.