

This section almost same with technique I posted before, but this time I try to use Gradient Tool , Linear Gradient tool, Radial Gradient Tool, and few of layer style. Photoshop have many of technique so we can learn it one by one and try to combine one and another until we get new technique. Ups..am I speak too much?
OK, then lets see the tutorial …you can download it here... or keep read... more...
1. Create new file with dimension 600x300 pixel and resolution 72 pixel/inch.

2. Define foreground color is Black: #000000 and background color Dark Blue: #003371. Activate Gradient Tool and choose Foreground to background on gradient picker box and Linear Gradient on option bar. Create gradient like image below.


3. Next change background color to Light Blue: #00AEEF. Still using Gradient Tool, but this time choose Radial Gradient and checklist on Reverse on Option Bar.

4. Create new layer, then create gradient. Drag your mouse from the bottom right corner to the upper left corner of the canvas. Then change layer 1 Blending option to Screen.


5. Activate Horizontal Type tool, define font: Verdana, size: 80pt, Style: Bold Italic, Color: white #FFFFFF. Type your text and press CTRL + Enter if you done.

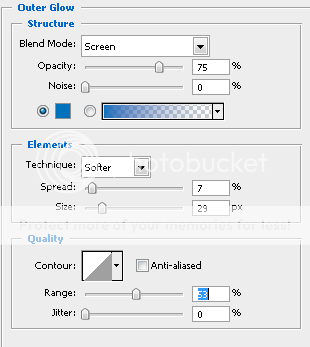
6. Still working on text layer, double click text layer on layer palette to show Blending Option dialog box. Choose Outer Glow , define Blend Mode: Screen, Opacity: 75%, color: #0071BC, Technique: Softer, Spread: 7, Size: 29 and Range: 53. Don’t press OK yet, still more to do.
7. Now choose Inner Glow, define Blend Mode: Screen, Opacity: 100%, color: #0071BC, Technique: Softer, Source: Edge, Choke: 0 and Size: 24. Don’t click OK yet, still more to do.

8. Next choose Bevel and Emboss, define Style: Inner Bevel, Technique: Smooth, Depth: 51, Direction: up, Size: 5 and Soften: 0. On Gloss contour, click on the box to show Contour Editor window, then create contour curve like image below.


9. Next choose Stroke and define size: 2 and color: Black #000000. Now you may click OK.

10. Next press D button on your keyboard to reset Photoshop color to default. Create new layer and bring it to the top of all layers. Change Blending Mode of new layer to Soft Light.

11. Last step apply Filter>Render>Clouds, repeat this step use CTRL + F until you get image you want. The values on this effect is not fix, you can try different value to get better result. And also you can save the layer style, so if you want to use it again you don’t have to make it over from the start.


6 comments:
hello there ;) visiting here ;)
hello....brouth
daripada cuma sekedar surfing mending kita saling klick ads....q dah klick ads mu.masing masing perusahaan ads1. kamu juga yaaa.....ok aq tunggu konfirmasi klick ads q.
Interesting.
Just to say HELLO! I need your help. Pls vote for me & go to Thoughtskoto,locate pinoy expats 2008,which is located in the middle of the blog and then vote for The New Beginning, Ronel Livelihood & Absolutely Joro.Thanks.
Ronel Livelihood
Joro, The New Beginning
Absolutely Joro
The World Of Joro
The Tale Of A Bukidnon Lad
Hi! Thanks for visiting my blog. I'm here too. :D
Hello!
Add My link or banner in your blog. I added your banner in my blog.
http://downloadpk.blogspot.com/
trimakasih atas infonya
Post a Comment