

This time I learn to make burning text with Photoshop program. This tutorial teach me how to use image mode, flatten image, Hue/Saturation colorize, and much more. It easy to follow because the instruction is detailed with image. Let me show you the tutorial, you can download the .Pdf file here… or you can keep reading More...
Create new file with dimension 400x400 pixels. Press D button on your keyboard to set foreground and background color to default. Use ALT + Del button combination to fill canvas with black.

Choose Horizontal Type Tool and type your text with white color. Arrange your text size use free transform CTRL + T. Hold Shift button and drag your mouse to make your text bigger. Press enter if you done.

Duplicate text layer use CTRL + J, then click on eye icon of text layer copy to hide it.

On menu choose Image>Rotate Canvas>90⁰CCW.

Choose the original text layer and on menu choose Filter>Stylize>Wind. It will show dialog box and ask you to rasterize the type, choose yes. Then on Wind dialog box define Method: wind and Direction: from Right, then click OK.

Repeat Wind Filter one more time use CTRL + F, then rotate the canvas again in menu Image>Rotate Canvas>90⁰CW.

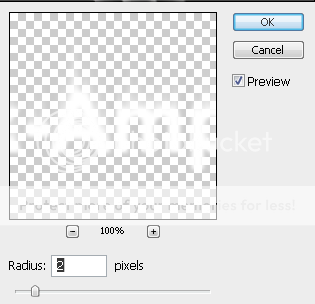
Now apply Gaussian Blur Filter, in menu choose Filter>Blur>Gaussian Blur and set Radius: 2 pixels then press OK.
Next on menu choose Filter>Distort>Ripple, define Amount: 120% and Size: Medium.

Merge down the text layer and background use CTRL + E. Now change the image mode, in menu choose Image>Mode>Grayscale. Dialog box will appear, choose Flatten.

Change again image mode to Indexed Color, in menu choose Image>Mode>Indexed Color. Go to menu again and this time choose Image>Mode>Color Table. On Color Table dialog box choose Table: Black Body.

Change the image mode back to RGB, in menu choose Image>Mode>RGB. Now activate Horizontal Type Tool, and type the same text but this time use black color. Don’t forget to fix the font type and size from text before. Use free transform CTRL + T and hold Shift button then arrange the size to match it.

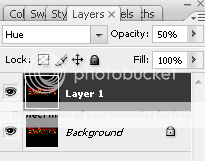
Merge all layer, on menu choose Layer>Flatten Image. Now duplicate background layer use CTRL + J. the new layer automatically named layer 1.

With layer 1 selected change the Blending mode to HUE and change Opacity to 50%.
Next use CTRL + U to view Hue/Saturation dialog box. Mark checkbox Colorize, then define Hue: 30, Saturation: 100 and Lightness: 0.

Finally your burn text is done. Now your fire look really burn with fire around it. Hope this tutorial can make your idea come and create a new technique.


3 comments:
Thanks for visiting my blog and the comment on my tagboard. I like visiting tutorial sites, too bad this is Photoshop. I don't have it, I use Paint Shop Pro. Is this using Adobe Photoshop Elements or the expensive one?
i like photoshops a lot. but sometimes, i lose my patience and decide to just not finish what i am doing.
tutorials are really good ways in developing your skills on it.
have a great day!
ada tutorial bikin banner enggak??
Post a Comment